Calyros DevLog #2 - Creating terrain using array mesh
Published on
rpg-devlog rpg multiplayer godot gdscript coding game-dev 3d
Hey you, this is number 2. Do you wanna read number 1?
No? Okay.
After the previous DevLog, I felt as though I'd taken 2 steps forward and one step back.
Even though I'm still finding my feet with this project, I felt like I'd spent quite a lot of energy and didn't have much to show for it.
I did have a heightmap though, and a rough idea what to do next.
So, if you remember from my previous post, I'd created this 16x16 grid of tiles and I needed to turn it into terrain. I knew I needed to turn this into a mesh, but I wasn't exactly sure how to do that.
I also knew - though I can't remember quite how - that meshes were made up of triangles, but I wasn't sure how to get started with them.
After searching around online, I eventually found some relevant documentation - Godot's documentation is pretty good. What I needed to create was an ArrayMesh.
Once I'd figured out how the libraries work in Godot, the process was actually pretty straightforward.
To create a square tile on the map, I needed to create two triangles.
With a grid of points, I started at (0, 0). To create a square, I needed four corners - each defined as a Vector3. In other words, a point in three-dimensional space. We'll call these points A, B, C and D.
As each tile is a one-meter square, I know that x and z (y is up, we'll get to that) are only going move 1 meter in any direction.
Godot's Z axis goes from top to bottom, so here's how I defined them.
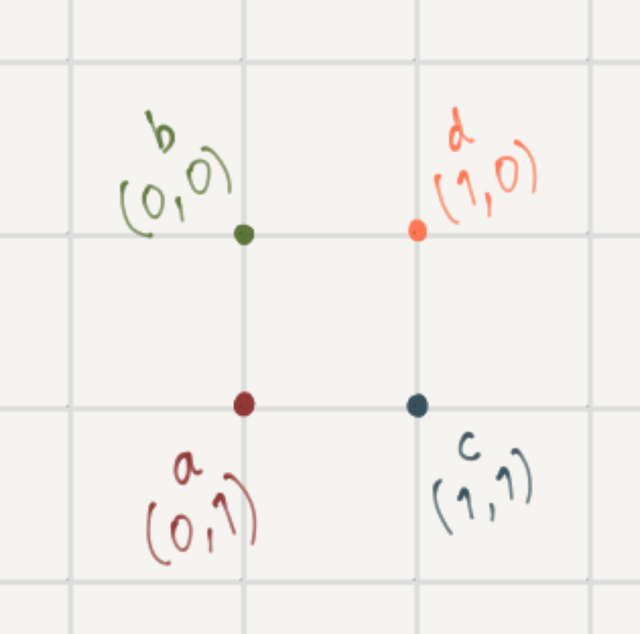
In the image above, you can see the four points defined. But A, B, C and D need to be 3D vectors. They're defined like so...
var a: Vector3 = Vector3(0, ?, 1);
var b: Vector3 = Vector3(0, ?, 0);
var c: Vector3 = Vector3(1, ?, 1);
var d: Vector3 = Vector3(1, ?, 0);
To populate the Y axis (marked with "?" here) I just need the height I generated previously.
Additionally, I don't want to draw all the tiles in the same place, I need the 0's and 1's in the Vectors above to be offsets. I've aligned the properties here to make it more obvious.
var a: Vector3 = Vector3(x,     heights[x][z], z + 1);
var b: Vector3 = Vector3(x,     heights[x][z], z    );
var c: Vector3 = Vector3(x + 1, heights[x][z], z + 1);
var d: Vector3 = Vector3(x + 1, heights[x][z], z    );
Now, with the four 3D vectors, I can make two triangles. The triangles I chose are ABC and CBD - mainly because they're easy to remember - but as long as your triangles don't overlap and are drawn clockwise (anti-clockwise will draw them upside down), you should be good!
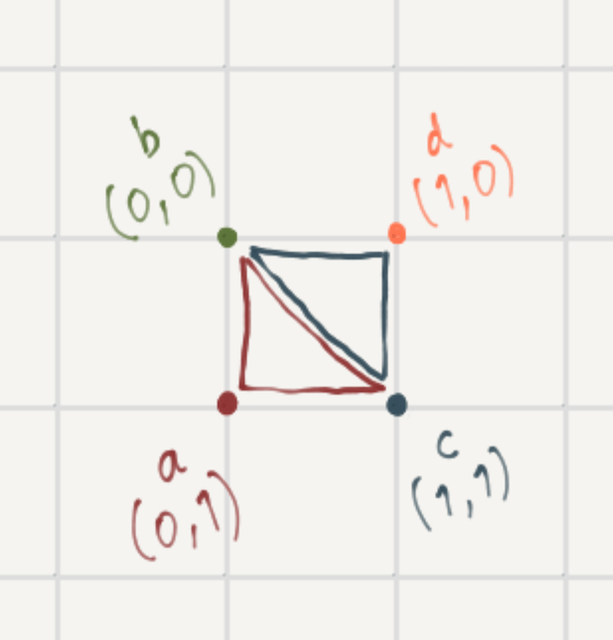
Now, I need to pack the vectors. First I needed to pack the vertices for triangle ABC and then pack the vertices for triangle CBD. I've also included some code to generate some if you want to do this yourself.
@tool extends Node3D

func _ready() -> void:
	# First, we're going to generate random heights
	var heights: Array = [];

	# We go up to 17 here, because a 16x16 grid contains 17 vertices horizontally
	for x in 17:
		var row: Array = [];
		for z in 17:
			# Add a random height between 0 and half a meter.
			row.append(randf_range(0, 0.5))
		heights.append(row);

	# We need to "pack" vertices in a special kind of array that hold Vector3s
	var vertices: PackedVector3Array = PackedVector3Array();

	# We only go up to 16 now, because if we went up to 17, x + 1 wouldn't exist
	for x in 16:
		for z in 16:
			# This is a square tile...

			# ... so we create our four points
			var a: Vector3 = Vector3(x, heights[x][z + 1], z + 1);
			var b: Vector3 = Vector3(x, heights[x][z], z);
			var c: Vector3 = Vector3(x + 1, heights[x + 1][z + 1], z + 1);
			var d: Vector3 = Vector3(x + 1, heights[x + 1][z], z);

			# Pack triangle ABC first
			vertices.push_back(a);
			vertices.push_back(b);
			vertices.push_back(c);

			# Then pack triangle CBD
			vertices.push_back(c);
			vertices.push_back(b);
			vertices.push_back(d);
Moving from left-to-right and then from top-to-bottom, this script will create and pack all the triangles in our mesh.
Watch out for the dimensions here! The first time I generated my terrain, I generate a 16x16 grid of vertices - which actually makes a 15x15 grid.
Also, if you want to put multiple chunks together, the values in column and row 17, need to match the values in column and row 0 for the adjacent chunks.
If you run this code, nothing will happen. I've got a list of vertices, but there's a little bit more to do.
Using this code, I can place all our vertices into an array for creating a mesh.
# Create an array to hold our mesh data
var mesh_data: Array = [];

# Resize the array - the mesh is expecting a particular size
mesh_data.resize(ArrayMesh.ARRAY_MAX);

# Set the value at position ArrayMesh.ARRAY_VERTEX (which is actually 0) to our array of vertices
mesh_data[ArrayMesh.ARRAY_VERTEX] = vertices;
Now that I've got my formal mesh data. I have to create a mesh.
# Create an empty mesh
var mesh: ArrayMesh = ArrayMesh.new();

# Add our mesh data as a surface
mesh.add_surface_from_arrays(Mesh.PRIMITIVE_TRIANGLES, mesh_data);
And now, I have a mesh. The very final step is to add the mesh to our scene.
# Create an empty mesh instance
var mesh_instance = MeshInstance3D.new();

# Load our mesh into it
mesh_instance.mesh = mesh;

# Remove any old meshes - we only need one!
for child in self.get_children():
	child.queue_free();

# Add our mesh instance as a child of the scene
self.add_child(mesh_instance);
Finally, I had a mesh that was 16 by 16 tiles. But it didn't look right.
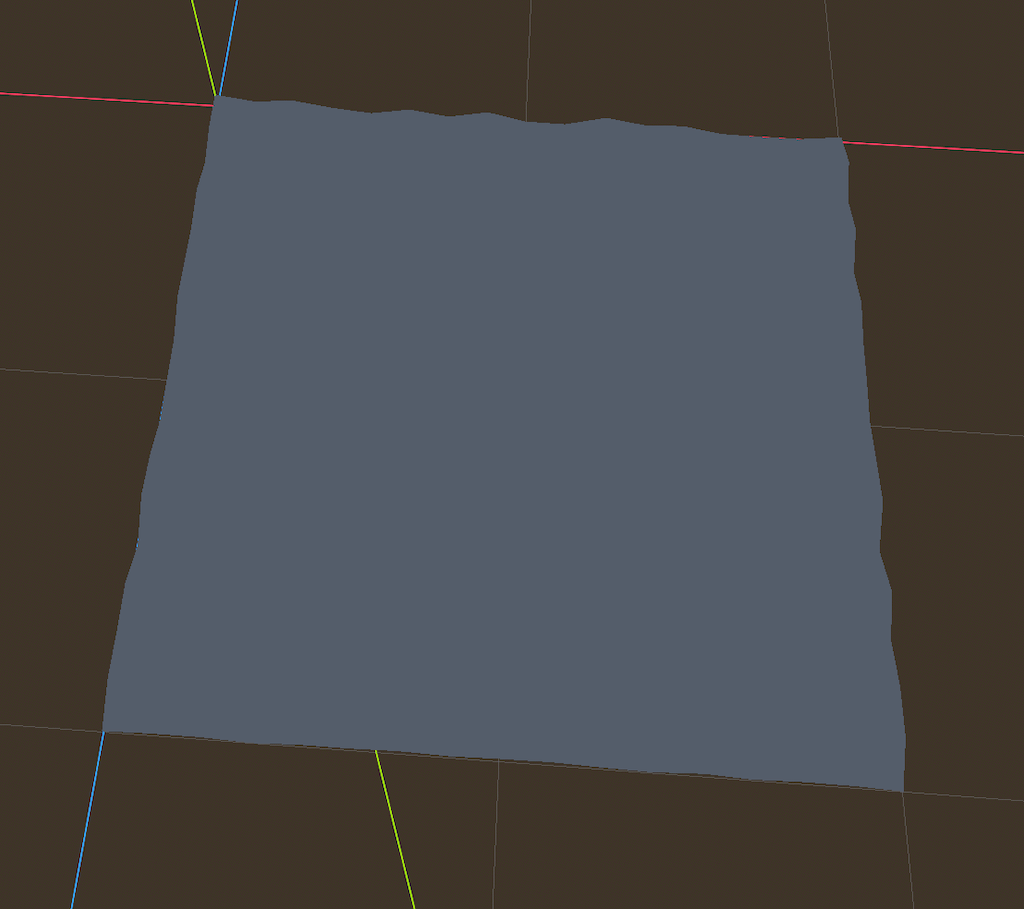
When you load up a 3D scene in Godot, if your scene doesn't have a light source, it will add one for you so you can preview it.
But even though I could see the "bumps" in my terrain mesh, it didn't seem to be interacting with light at all.
After a bit of searching around, I discovered I need to add normal data to my mesh. I didn't know what normals were, much less how to add them to a mesh. Back to Google, it seems.
After a lot of reading and scratching my head, I eventually figured it out, I think. Normals tell the render how to "bounce" light. This was basically hitting the current limit of maths knowledge, so it took my a while to wrap my head around it, but it's simpler than I thought, so I'll try to explain it now.
Think of a table, or any other surface. When light hits the surface, it bounces off in the opposite direction from it's source. In order to calculate that direction, we need a normal.
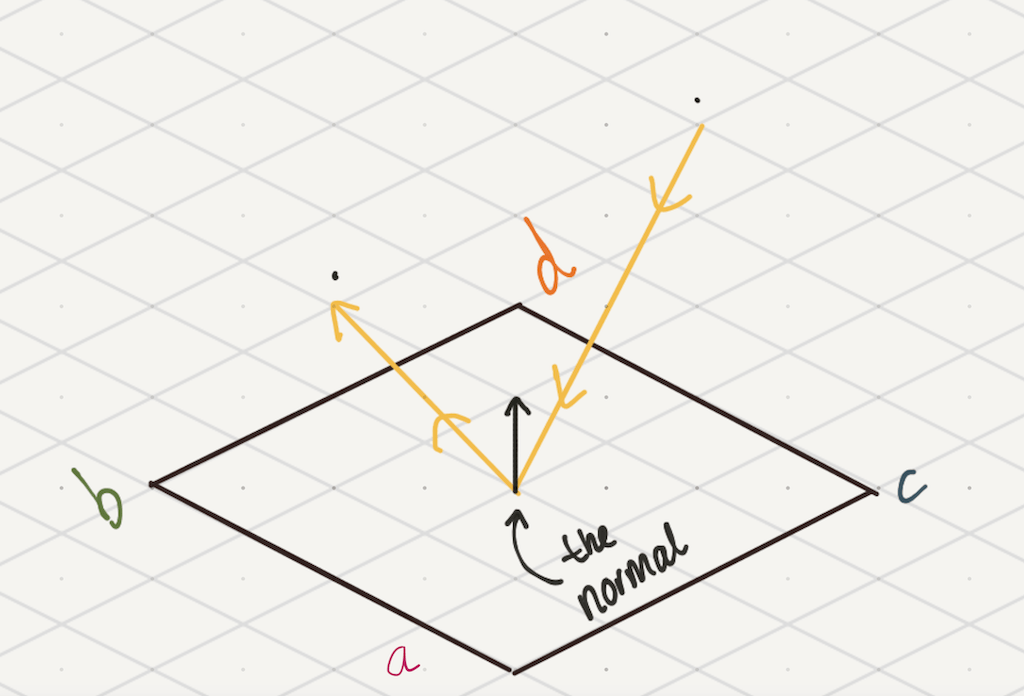
The normal is effectively describing the direction the triangle is facing.
Beyond this point, I'm stretching my knowledge of maths a little, but it basically goes like this.
Remember Vectors A, B and C, I defined earlier? I'll ignore D, now now, because I'm working on a triangle by triangle basis.
I create a line from A to B, and we call it AB. Then, I create another line from B to C called BC. Now that we have the two lines, we need to find the point that's perpendicular to both lines.
In maths, this is called a cross product.
Thankfully, in Godot there's a function that'll do that for us. AC.cross(AB)
# Define the line AC
var ac = c - a;

# Define the line AB
var ab = b - a;

# Calculate the cross product
var abc: Vector3 = ac.cross(ab).normalized();
abc is a "direction". The normalized() function here basically keeps the proportions of x, y and z but limits the distance to 1.
Now that I have the Vector, I pack it in a similar way to the vertices before. I add the normal three times. Once for each vertex. If I wanted to - and if I was better at maths - I could adjust these values slightly and blend light more smoothly between the vertices.
Here's the updated code:
@tool extends Node3D

func _ready() -> void:
	# First, we're going to generate random heights
	var heights: Array = [];

	# We go up to 17 here, because a 16x16 grid contains 17 vertices horizontally
	for x in 17:
		var row: Array = [];
		for z in 17:
			# Add a random height between 0 and half a meter.
			row.append(randf_range(0, 0.5))
		heights.append(row);

	# We need to "pack" vertices in a special kind of array that hold Vector3s
	var vertices: PackedVector3Array = PackedVector3Array();
>>	var normals: PackedVector3Array = PackedVector3Array();

	# We only go up to 16 now, because if we went up to 17, x + 1 wouldn't exist
	for x in 16:
		for z in 16:
			# This is a square tile...

			# ... so we create our four points
			var a: Vector3 = Vector3(x, heights[x][z + 1], z + 1);
			var b: Vector3 = Vector3(x, heights[x][z], z);
			var c: Vector3 = Vector3(x + 1, heights[x + 1][z + 1], z + 1);
			var d: Vector3 = Vector3(x + 1, heights[x + 1][z], z);

			# Pack triangle ABC first
			vertices.push_back(a);
			vertices.push_back(b);
			vertices.push_back(c);

			# Then pack triangle CBD
			vertices.push_back(c);
			vertices.push_back(b);
			vertices.push_back(d);

>>			# Define the line AC
>>			var ac = c - a;
>>			# Define the line AB
>>			var ab = b - a;
>>			# Calculate the cross product
>>			var abc: Vector3 = ac.cross(ab).normalized();

>>			# Define the line AC
>>			var cd = d - c;
>>			# Define the line AB
>>			var cb = b - c;
>>			# Calculate the cross product
>>			var cbd: Vector3 = cd.cross(cb).normalized();

>>			# First add the normals of the first triangle
>>			normals.push_back(abc);
>>			normals.push_back(abc);
>>			normals.push_back(abc);

>>			# And then the second triangle
>>			normals.push_back(cbd);
>>			normals.push_back(cbd);
>>			normals.push_back(cbd);

	# Create an array to hold our mesh data
	var mesh_data: Array = [];

	# Resize the array - the mesh is expecting a particular size
	mesh_data.resize(ArrayMesh.ARRAY_MAX);

	# Set the value at position ArrayMesh.ARRAY_VERTEX (which is actually 0) to our array of vertices
	mesh_data[ArrayMesh.ARRAY_VERTEX] = vertices;
>>	mesh_data[ArrayMesh.ARRAY_NORMAL] = normals;

	# Create an empty mesh
	var mesh: ArrayMesh = ArrayMesh.new();

	# Add our mesh data as a surface
	mesh.add_surface_from_arrays(Mesh.PRIMITIVE_TRIANGLES, mesh_data);

	# Create an empty mesh instance
	var mesh_instance = MeshInstance3D.new();

	# Load our mesh into it
	mesh_instance.mesh = mesh;

	# Remove any old meshes - we only need one!
	for child in self.get_children():
		child.queue_free();

	# Add our mesh instance as a child of the scene
	self.add_child(mesh_instance);
After I save and refresh, my terrain interacts nicely with light. Add a texture and boom! It's starting to look like a real game.
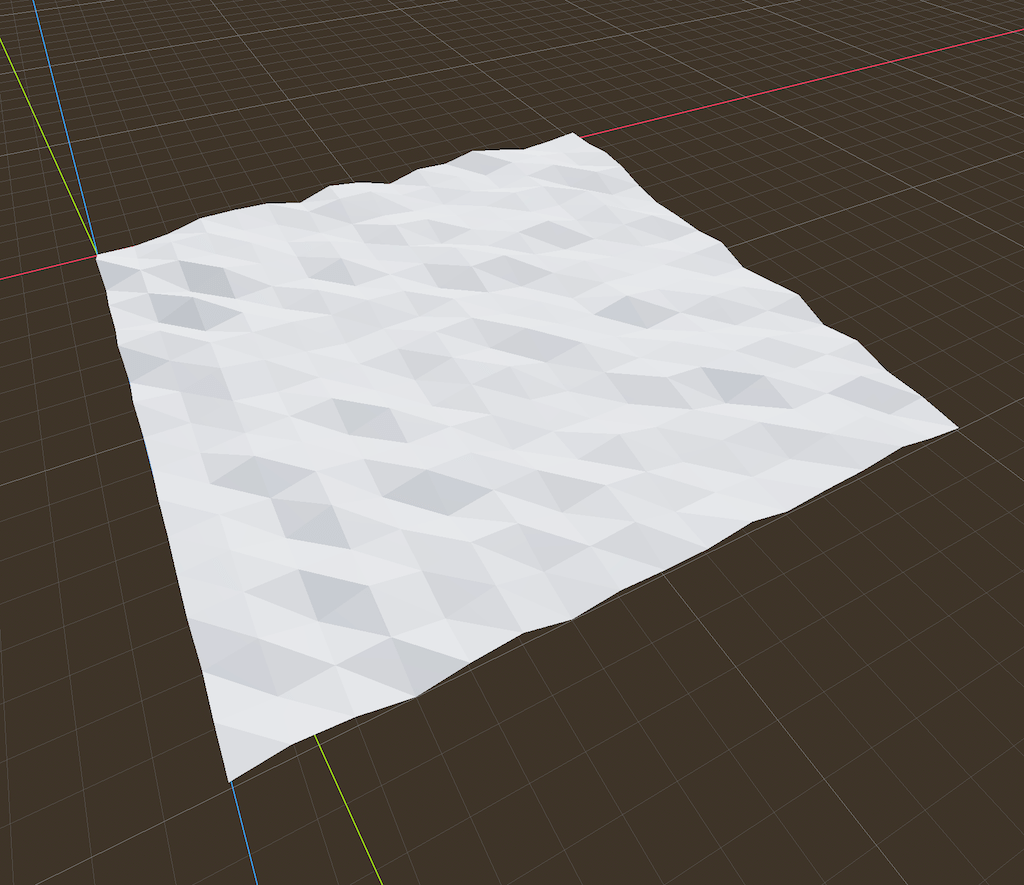
For now, that's all. It's not much but it feels like a huge step in the right direction.
I'm not sure I'll go into this much detail in general with these DevLogs, but I really wanted to show off what I had!
If you enjoyed this post, please subscribe - there're more posts to come.
~ Sam
