Calyros DevLog #4 - Create rivers, with maths! (and shaders)
Published on
Empowered by my recent success in creating terrain and applying textures to it that wasn't too shabby, I decided to move on to creating rivers. I had a rough idea of how I wanted this to work, but putting it into practice was more difficult than I anticipated.
I'll start with a little bit of the "theory" and then explain how I implemented it.
Update: I'm not sure I wanted to go into a deep-dive with this post, but after writing a detailed account, I asked if people on Bluesky wanted to read it and it became my (although still modest) most-liked post.
Because of how involved this process was, I'm going to keep things quite "high-level" and sprinkle in some code.
The rivers I wanted
The game I'm creating is a tile-based multiplayer RPG so my rivers don't need to "flow" and I don't need to worry about physics.
Whilst characters, objects, NPCs, walls etc are going to strictly occupy a tile, when I was playing around with river concepts, I didn't like how things looked when I simply designated a tile as water and coloured it blue.
Instead, I wanted to have natural looking rivers (or ponds, lakes, etc), despite the tile-based nature of the game.
On top of that, I really wanted to be able to define rivers with the minimal amount of configuration. My game is going to be multiplayer (socket networking devlog coming soon), and so if the data about rivers was complex, it'd bloat file sizes. Additionally, I haven't yet developed any tooling for my game yet, but when I do I basically just want to be able to tweek a few dials and ta da, a wild river appears.
The points of a river
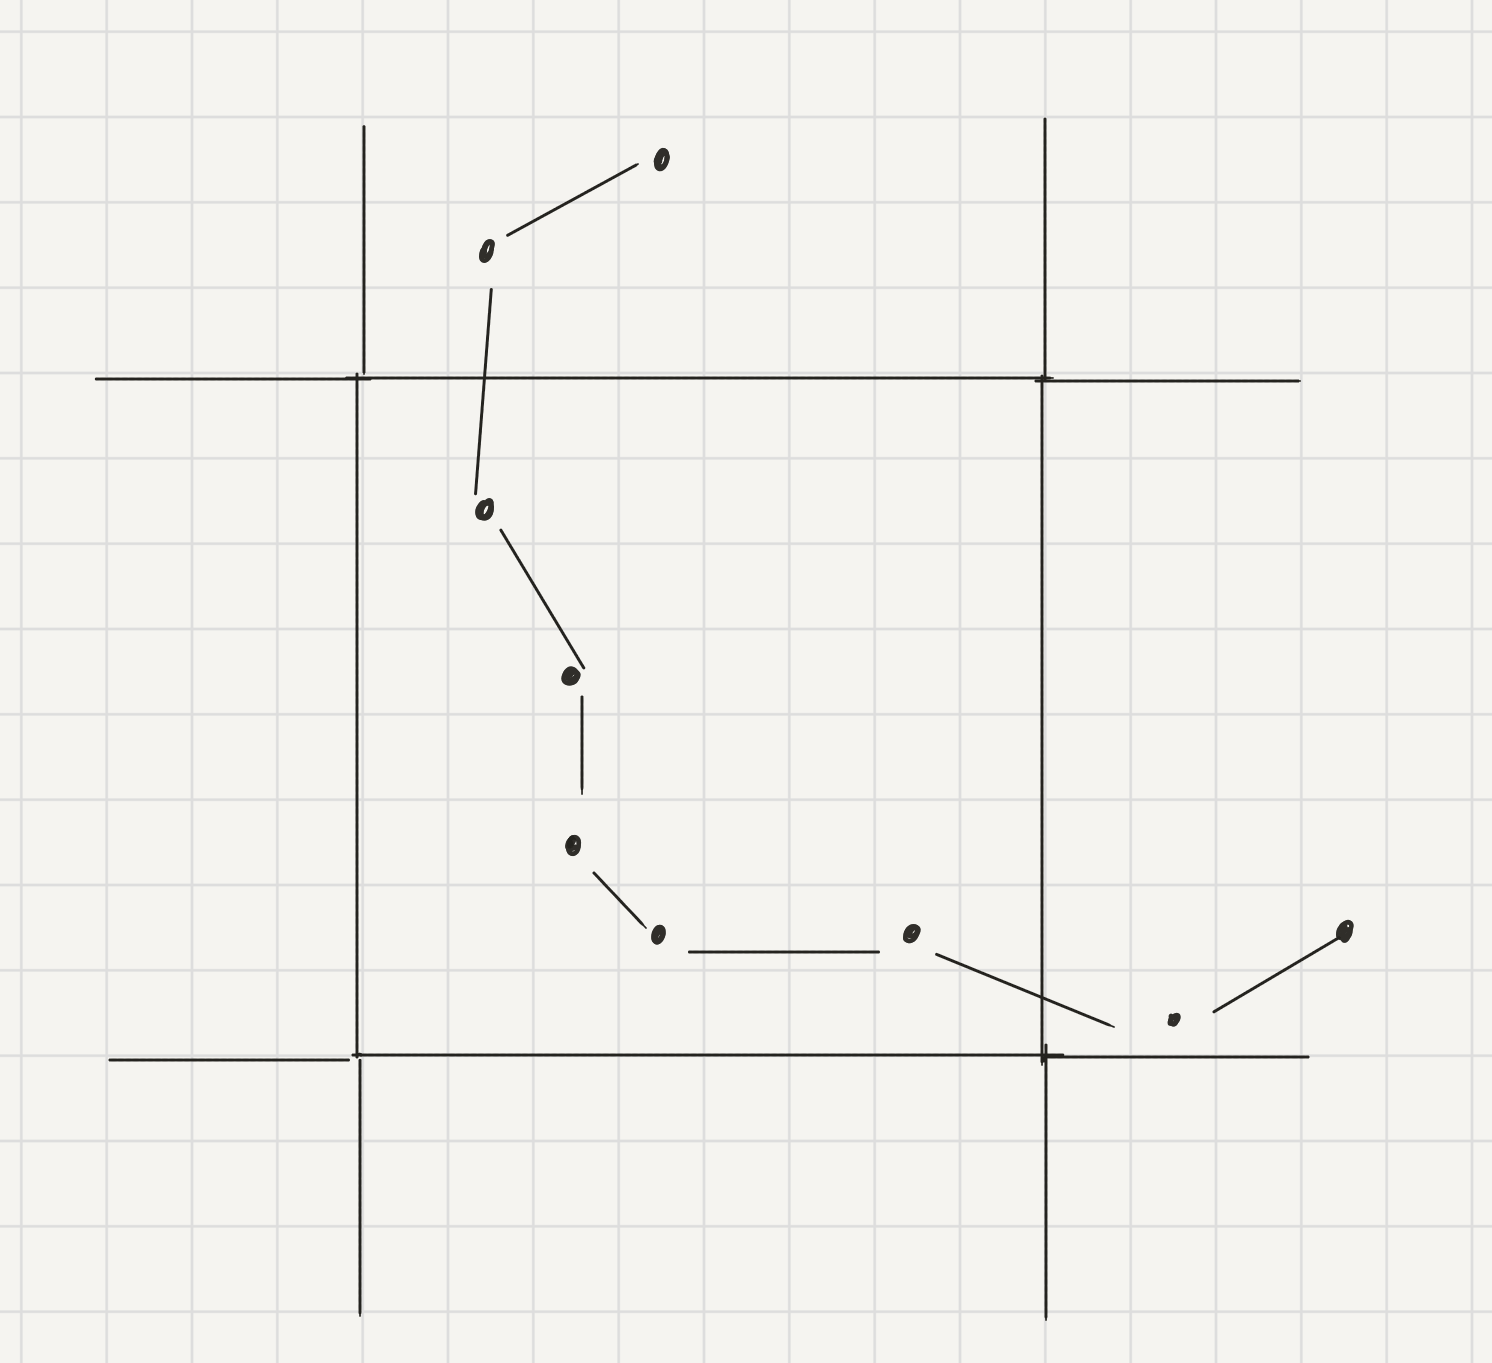
To begin with, I decided to define my rivers as a series of points along a map.
In the image below, the large square in the middle is the "chunk" that we're currently drawing. Some points of the river are inside the chunk, and some are outside of it.
The width of a river
I wanted to make my river a flat plane that intersected the banks on either side of it so I knew that my river also needed width.
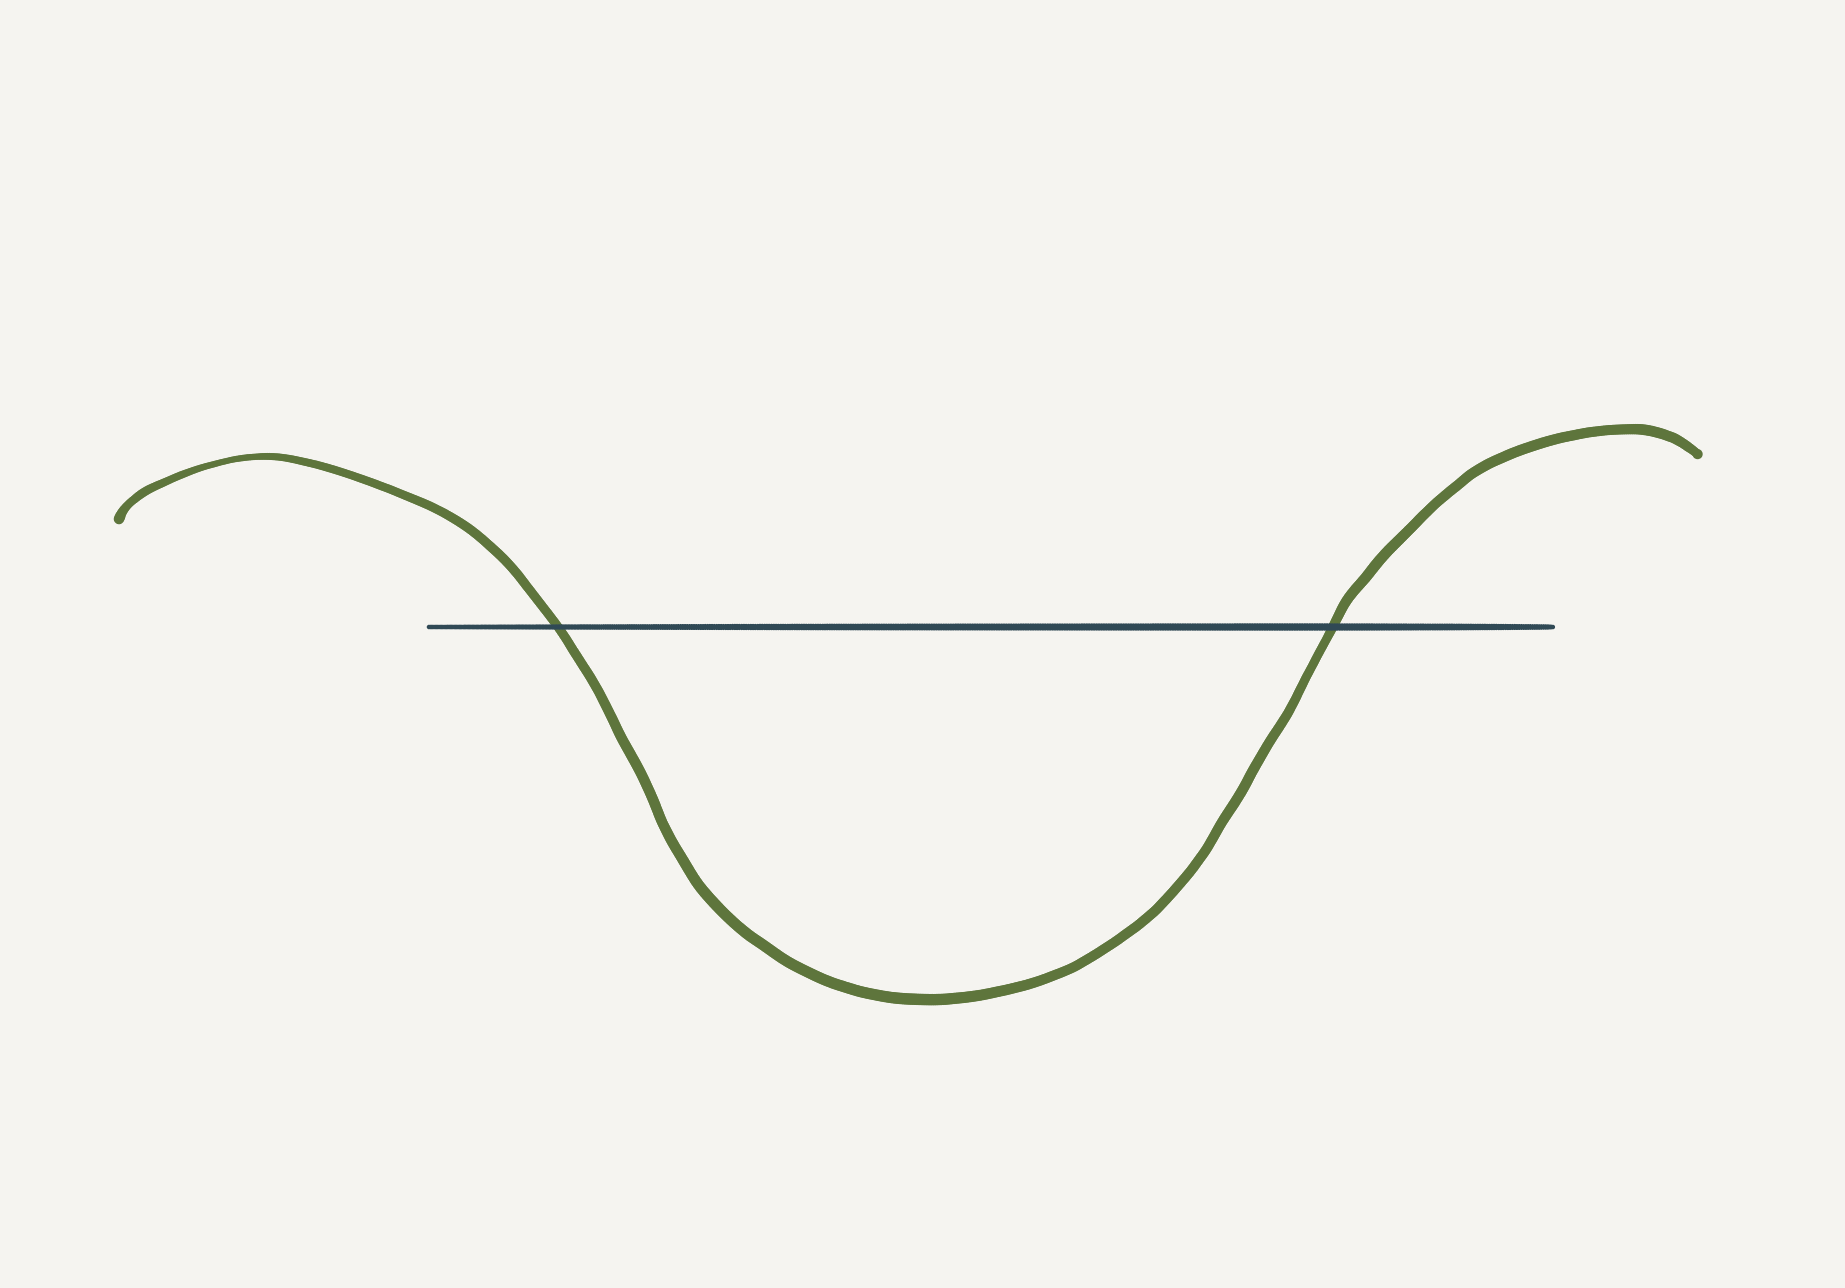
Once I had a flat plane, I could apply materials and shaders to make it look realistic.
In my previous post about shaders, I'd said that if done correctly, a single shader could be used for all my terrain needs - you'll see this further on.
If I could give the river a width at every point, I'd be able to tell the shader what these points were, and what the width was at these points, and automatically adjust the textures to show mud instead of grass based on the proximity of the terrain to the river.
Storing the data
First things first, I needed some river data to play with. I created the following resource.
@tool class_name River extends Resource;

@export var points: Array[Vector2i] = [];
@export var widths: Array[float] = [];

static func test() -> River:
	var river = River.new();
	river.points.append(Vector2i(0, 5))
	river.points.append(Vector2i(6, 4))
	river.points.append(Vector2i(12, 3))
	river.points.append(Vector2i(13, 2))
	river.points.append(Vector2i(13, 0))
	river.widths.append(1.0);
	river.widths.append(1.0);
	river.widths.append(1.0);
	river.widths.append(1.0);
	river.widths.append(1.0);
	return river;
As you can see from the code snippet, a river has two variables.
- Points - an array of Vector2i that defined the path along the map that my river would take
- Widths - an array of floats (the same size as the points) that defined the width of the river at each point.
Also, in my resource, I added a static function called test(). Because my resource has a class_name of River, I can call the static test() function from anywhere in my code and get a river back that I can test.
Drawing my mesh
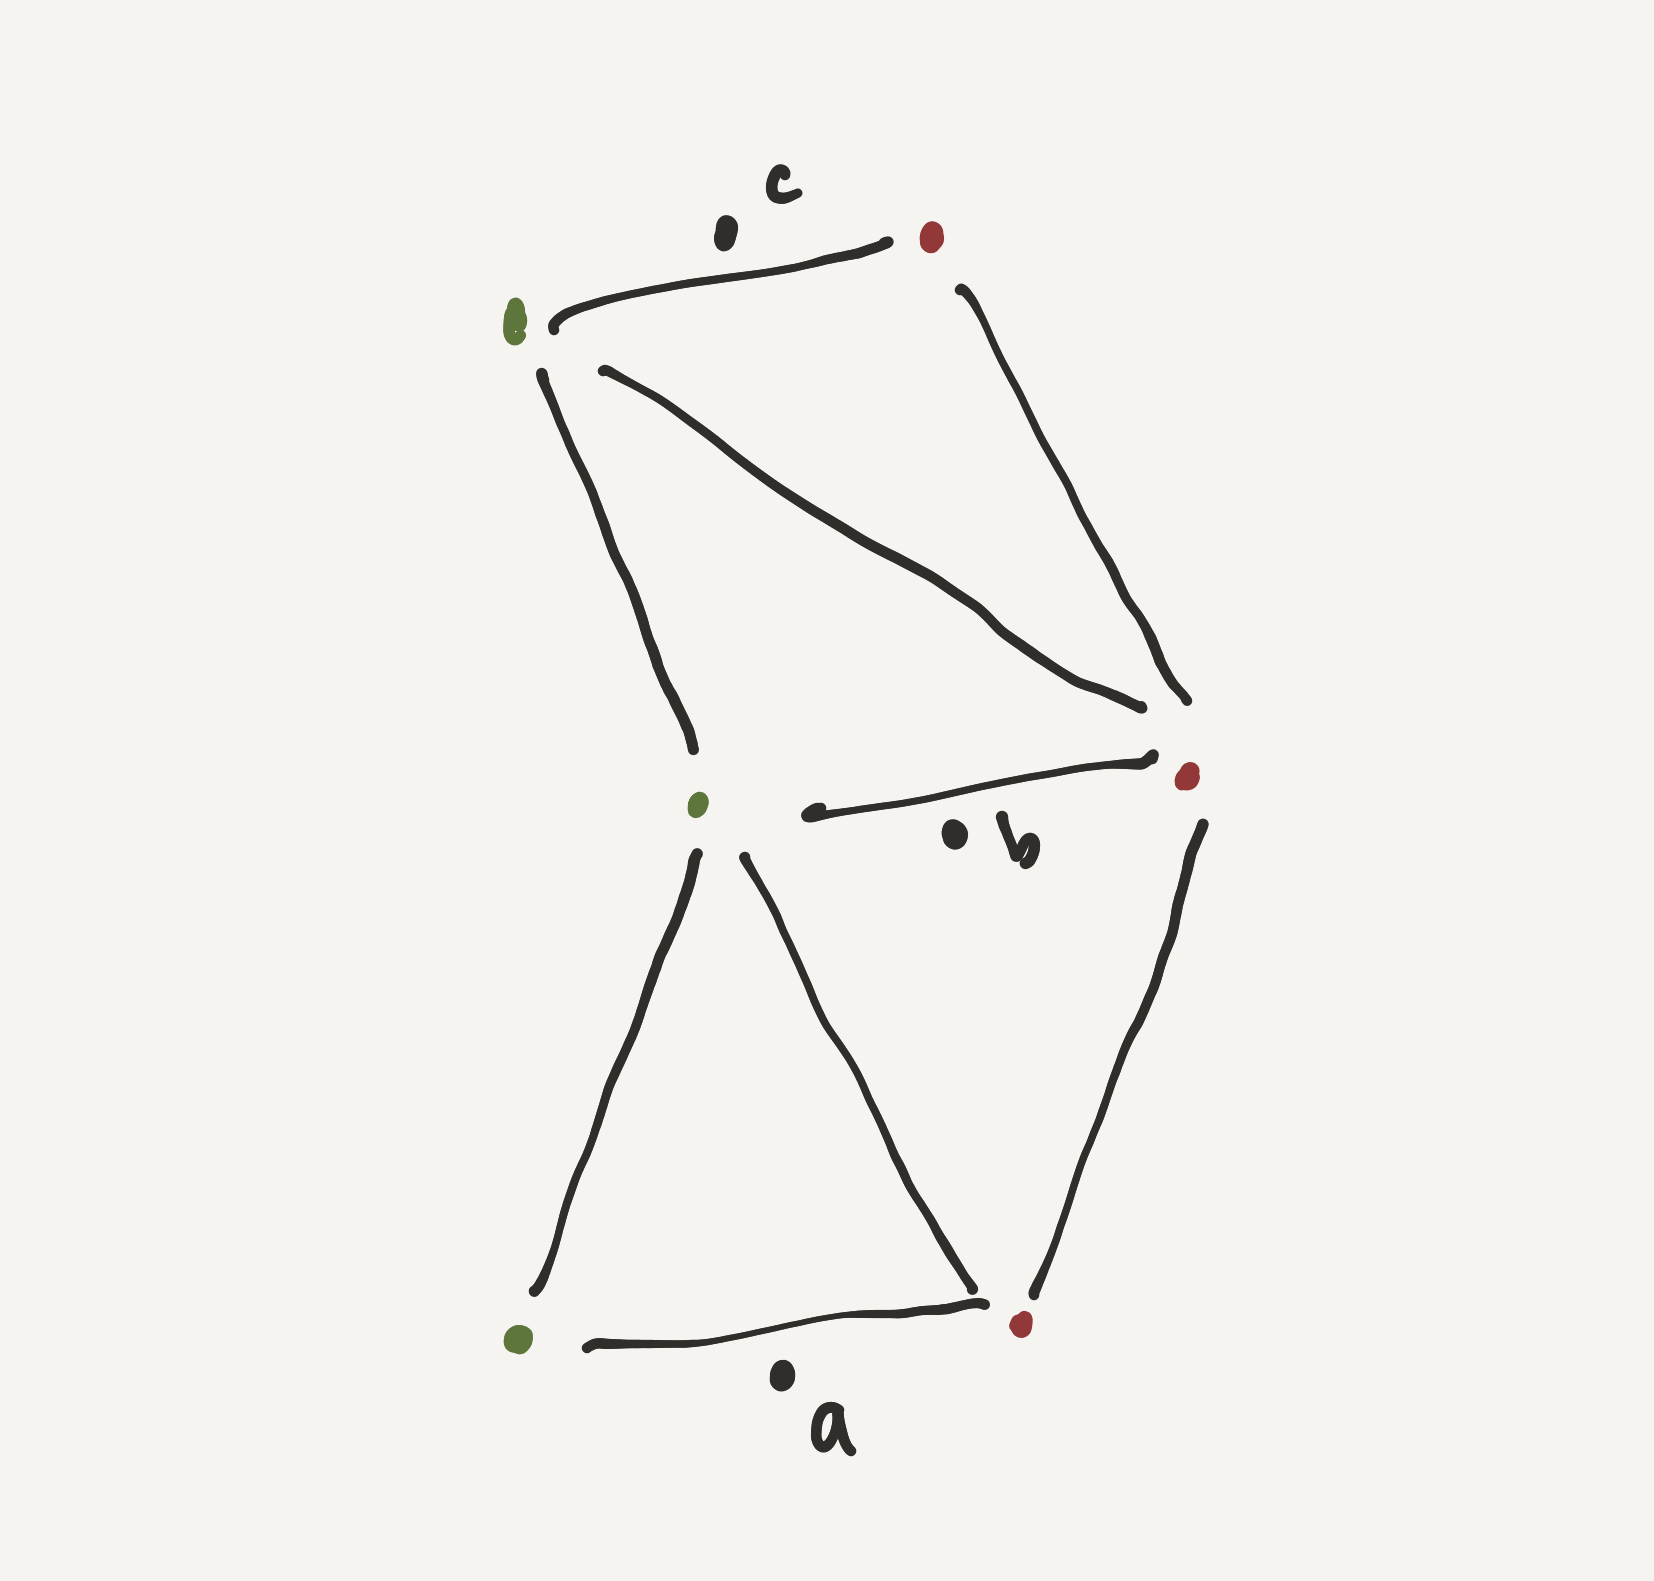
In the image above, I have black dots and lines that define the path of a river through my map.
Note: Apologies, the points don't match my test river in the snippet above
To the right of this path (in red) and to the left of this path (green) are a series of dots that allow me to create a mesh.
To get these points, I had to go through these steps...
Get the points I care about
It's not the case in the snippet above, but it's likely that a river will cross many chunks. Because of that, I needed to get the points in the river I care about. So I added a get_points_within() function to my resource.
func get_points_within(
	a: Vector2i,
	b: Vector2i,
) -> Array:
	var points_to_return: Array = [];

	# First, let's get all points that fall within the bounds
	var indices_within: Array = [];
	for i in self.points.size():
		var point: Vector2i = self.points[i];
		if point.x >= a.x and point.x <= b.x and point.y >= a.y and point.y <= b.y:
			indices_within.append(i)

	# We need all points that fall within the boundaries, but we also need
	# all points adjacent to those, regardless of whether they're within the
	# boundaries.
	for i in indices_within.size():
		var point_index: int = indices_within[i];

		var not_first_point_in_road: bool = point_index > 0;
		var not_last_point_in_road: bool = point_index < self.points.size() - 1;
		var previous_point_is_not_within: bool = (point_index - 1) not in indices_within;
		var next_point_is_not_within: bool = (point_index + 1) not in indices_within;

		if previous_point_is_not_within and not_first_point_in_road:
			points_to_return.append(self.points[point_index - 1]);

		points_to_return.append(self.points[point_index]);

		if next_point_is_not_within and not_last_point_in_road:
			points_to_return.append(self.points[point_index + 1]);

	return points_to_return;
Given an north-west boundary of a and a south-east boundary of b it would find all points within a square and put them in an array.
But, because I'm chunking my terrain, I can't just draw the river that falls within my chunk. I also need to know about the adjacent points too, so I can draw right up to the boundary between chunks.
Note: There's some work I did later to make sure the "segments" of river joined nicely at the boundary of each chunk, but because you're probably not chunking your world and because it was really tedious, I've left it out of this post. Message me on Bluesky if you want details.
Extrude from these points to get the river edges
Now that I had a series of points that made up the "segment" of this river, I needed to extrude out from these points to get the river edge at each point.
To do this, I looped through each of my river points and created three variables, d, e and f.
-
e- the "current" point in the river -
d- the previous point in the river -
f- the next point in the river.
The code looked like this:
# Use our function to get the points we care about
var points: Array = self.river.get_points_within(bounds[0], bounds[1]);

# Loop through the points
for i in points.size():
	# Get the previous point
	var d: Vector2i;
	if i == 0: # If this is the first point in our list
		d = points[i]; # The previous point is this point
	else: # Otherwise
		d = points[i - 1]; # It's the previous point

	var e: Vector2i = points[i]; # The current point

	# Get the next point
	var f: Vector2i;
	if i == points.size() - 1: # If this is the next point
		f = points[points.size() - 1]; # Then the current point is the next point
	else: # Otherwise
		f = points[i + 1]; # The next point is the next point
And here's a diagram of what we're doing...
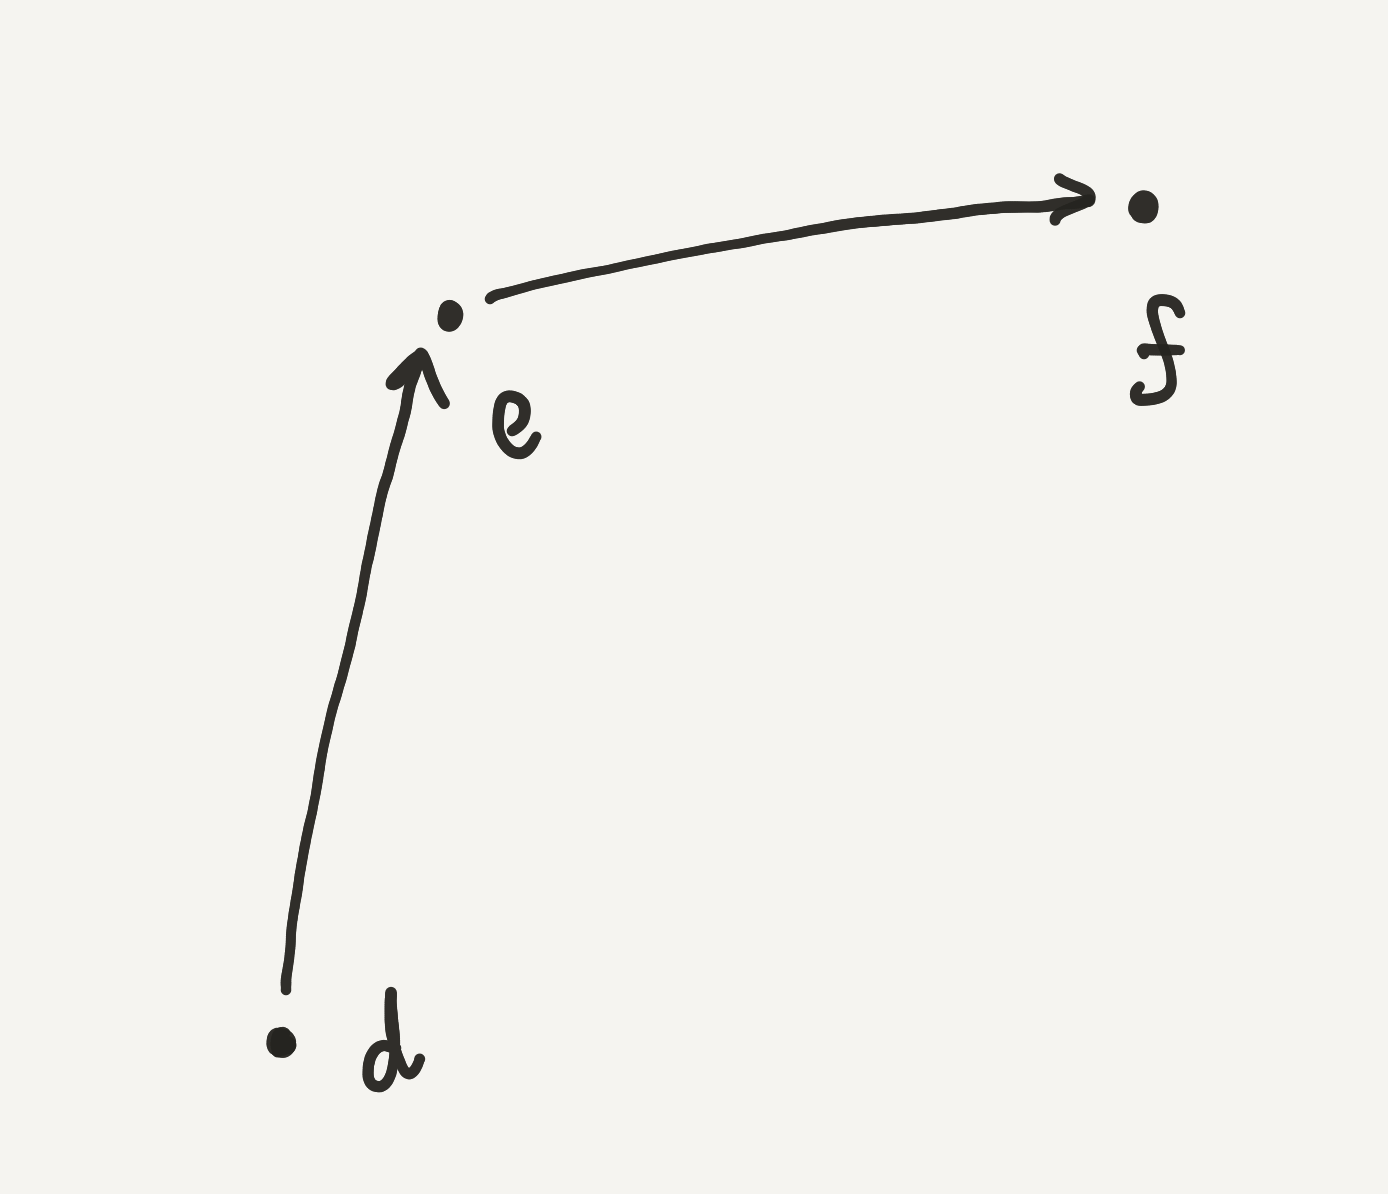
Now that we have our three points, we can use them. But first we need to convert them to Vector2 (instead of Vector2i). This is because each point of our river sits in the "middle" of our tile, not on the edge. So we need to add 0.5 to each of them.
var a: Vector2 = Vector2(d.x + TILE_OFFSET, d.y + TILE_OFFSET);
var b: Vector2 = Vector2(e.x + TILE_OFFSET, e.y + TILE_OFFSET);
var c: Vector2 = Vector2(f.x + TILE_OFFSET, f.y + TILE_OFFSET);
I've used a constant called TILE_OFFSET which is a float that equals 0.5.
Now, instead of using d, e and f, we're going to use a, b and c.
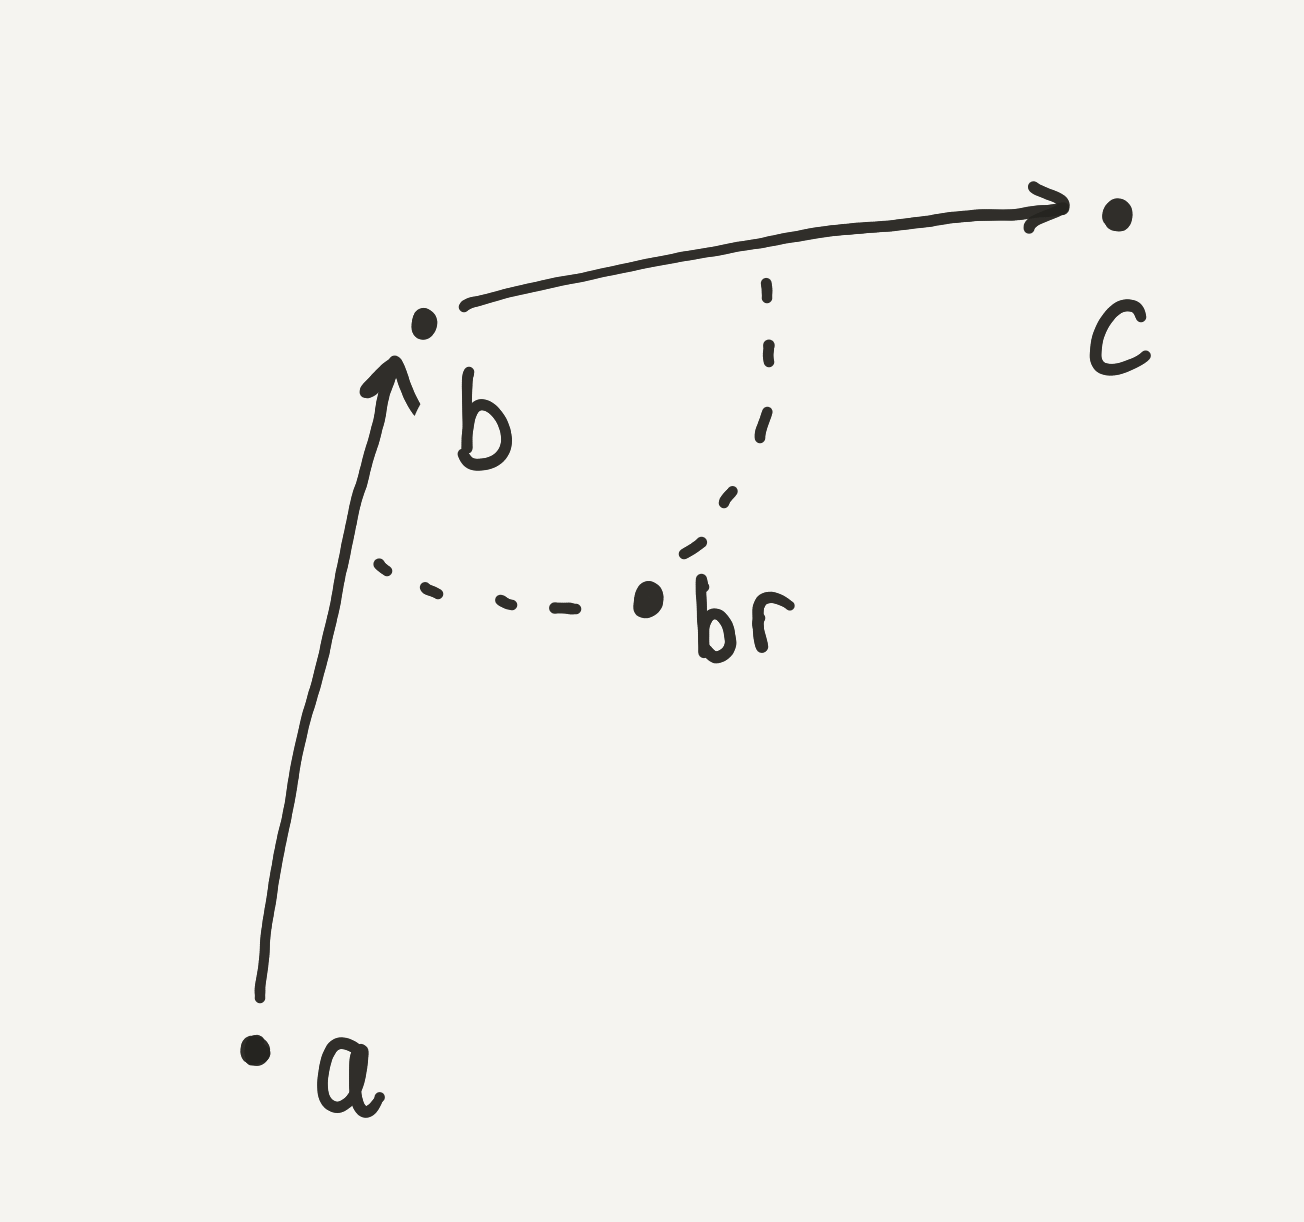
If our river is 1.0m wide, to find the point to the right of it (let's call it br), we need to find a point that is 0.5m meters away from b at an angle that's halfways between a and c. I realise that's a complicated statement, so here's another diagram.
After that, we need to find the point to the left. That we'll call bl.
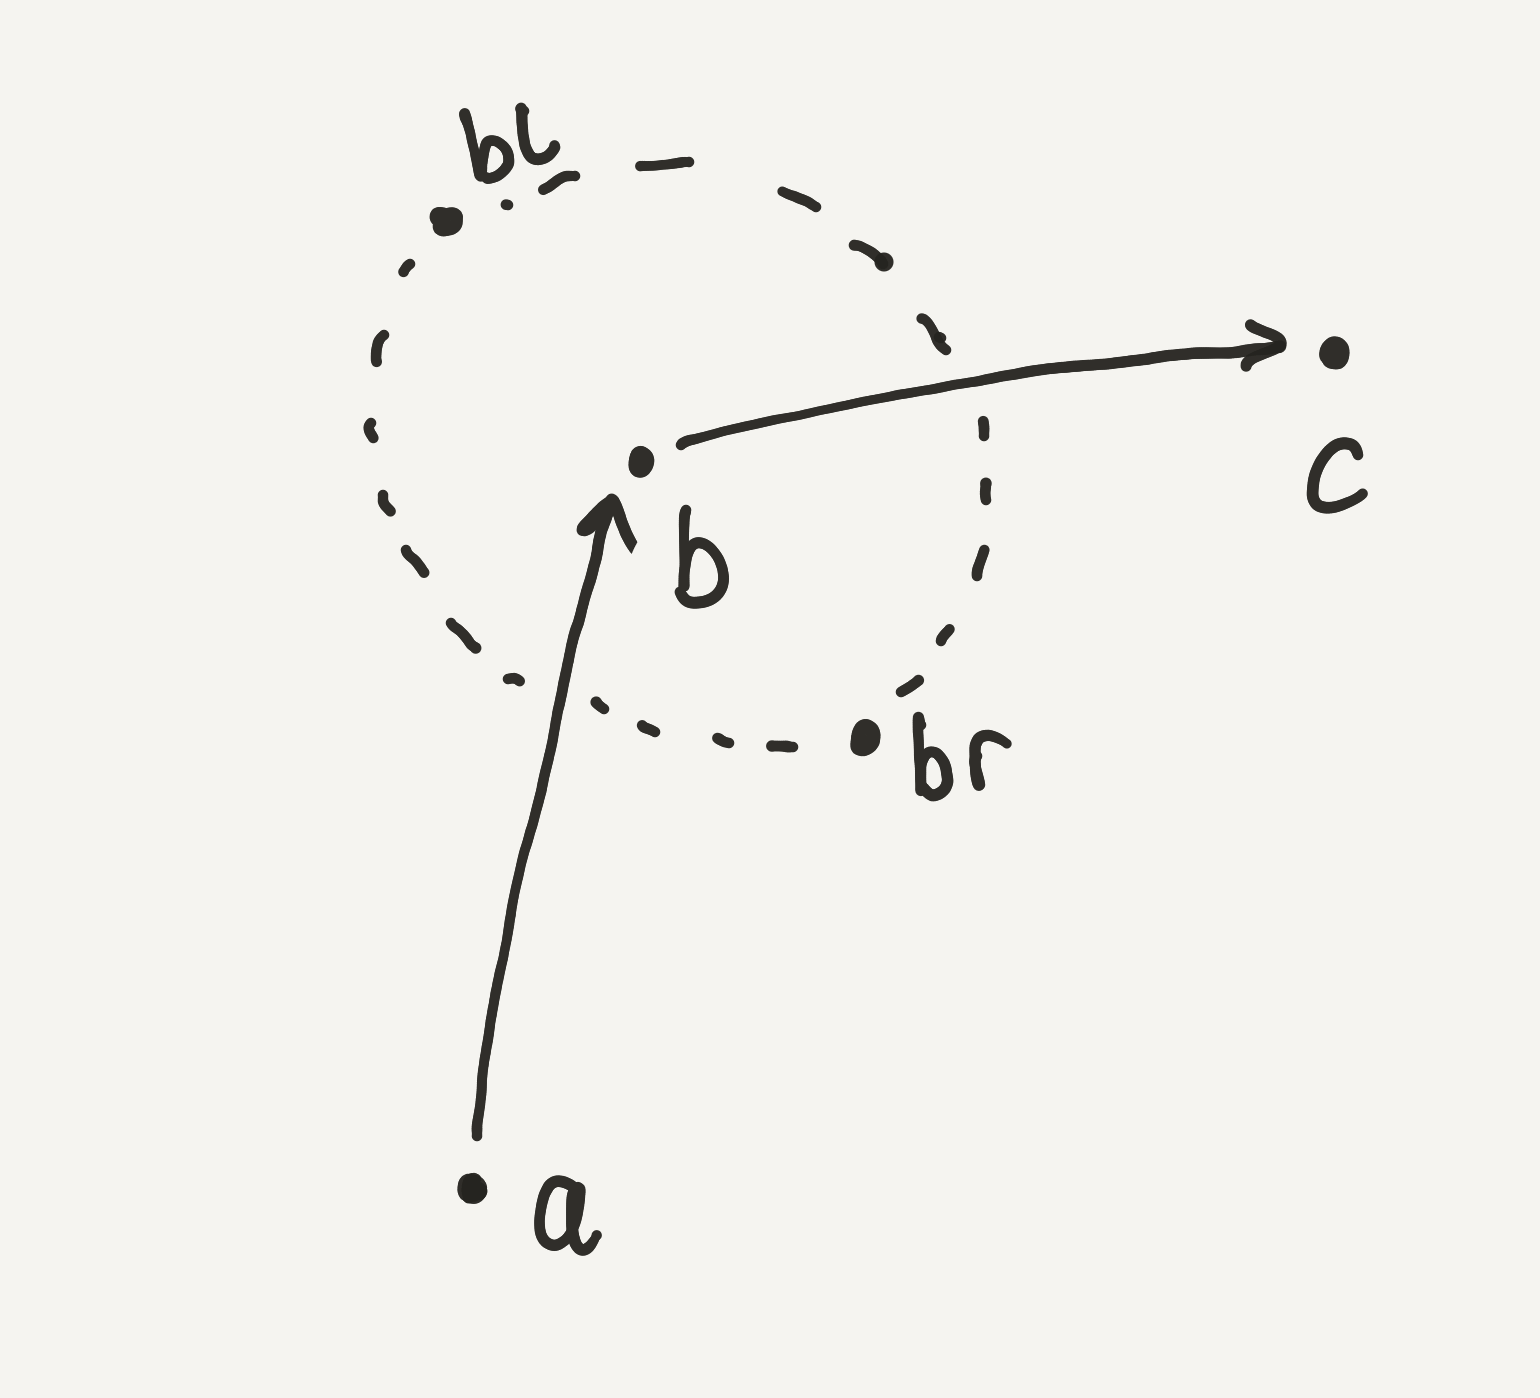
Here's how I did that.
var ab: Vector2 = b - a; # Create a vector that represents the line from a to b
var bc: Vector2 = c - b; # Create a vector that represents the line from b to c

var direction = (ab + bc).normalized(); # Use these two lines to create a "direction" or angle

var perpendicular = direction.rotated(-PI / 2); # Find the point that's perpendicular to this new direction

var bl = b + perpendicular * WIDTH; # From point b, move the rivers width towards the perpendicular to get the left point
var br = b - perpendicular * WIDTH; # From point b, move the rivers width towards teh perpendicular to get the right point

# For now, we set the "height" of the river to the terrain height
var height: float;
if d.x < 0 or d.x > 15 or d.y < 0 or d.y > 15:
	height = 0.0;
else:
	height = self.terrain.get_height_at(d)

# Create two Vector3 position. One for the left, one for the right.
var left: Vector3 = Vector3(bl.x, height, bl.y);
var right: Vector3 = Vector3(br.x, height, br.y);

# Add the points to an array we defined earlier (but isn't in this snippet)
river_data.append([
	left,
	right,
])
After this, we should have an array of arrays with vectors. The JSON notation would be something like this:
[
	[left, right],
	[left, right],
	[left, right],
	[left, right],
	[left, right],
]
Finally, to create a plane from these points that'll be the surface of our river we can use this code.
func make_mesh(river_data: Array) -> void:
	var mesh_data: Array = [];
	mesh_data.resize(ArrayMesh.ARRAY_MAX);

	var vertices: PackedVector3Array = PackedVector3Array();
	var indices: PackedInt32Array = PackedInt32Array();
	var normals: PackedVector3Array = PackedVector3Array();
	var uvs: PackedVector2Array = PackedVector2Array();

	var index: int = 0;
	for i in river_data.size() - 1:
		var a: Vector3 = river_data[i][0];
		var b: Vector3 = river_data[i + 1][0];
		var c: Vector3 = river_data[i][1];
		var d: Vector3 = river_data[i + 1][1];

		vertices.append_array(SamMakesCode_Helpers_Vertices.get_vertices_for_square(a, b, c, d));
		normals.append_array(SamMakesCode_Helpers_Normals.get_normals_for_square(a, b, c, d));
		uvs.append_array(SamMakesCode_Helpers_UVs.get_uvs_for_standard_square());

		for j in range(6):
			indices.push_back(index + j);
		index += 6;

	mesh_data[ArrayMesh.ARRAY_VERTEX] = vertices;
	mesh_data[ArrayMesh.ARRAY_INDEX] = indices;
	mesh_data[ArrayMesh.ARRAY_TEX_UV] = uvs;
	mesh_data[ArrayMesh.ARRAY_NORMAL] = normals;

	self.draw_mesh(mesh_data);
If you want to know more about how it works, check out part three of my devlog.
Ultimately, our mesh looks something like this.

They wouldn't be included in the mesh data, but I've labelled a, b and c here for reference.
Styling the mesh
Once I'd applied my new ArrayMesh to a mesh instance, it looked like this.
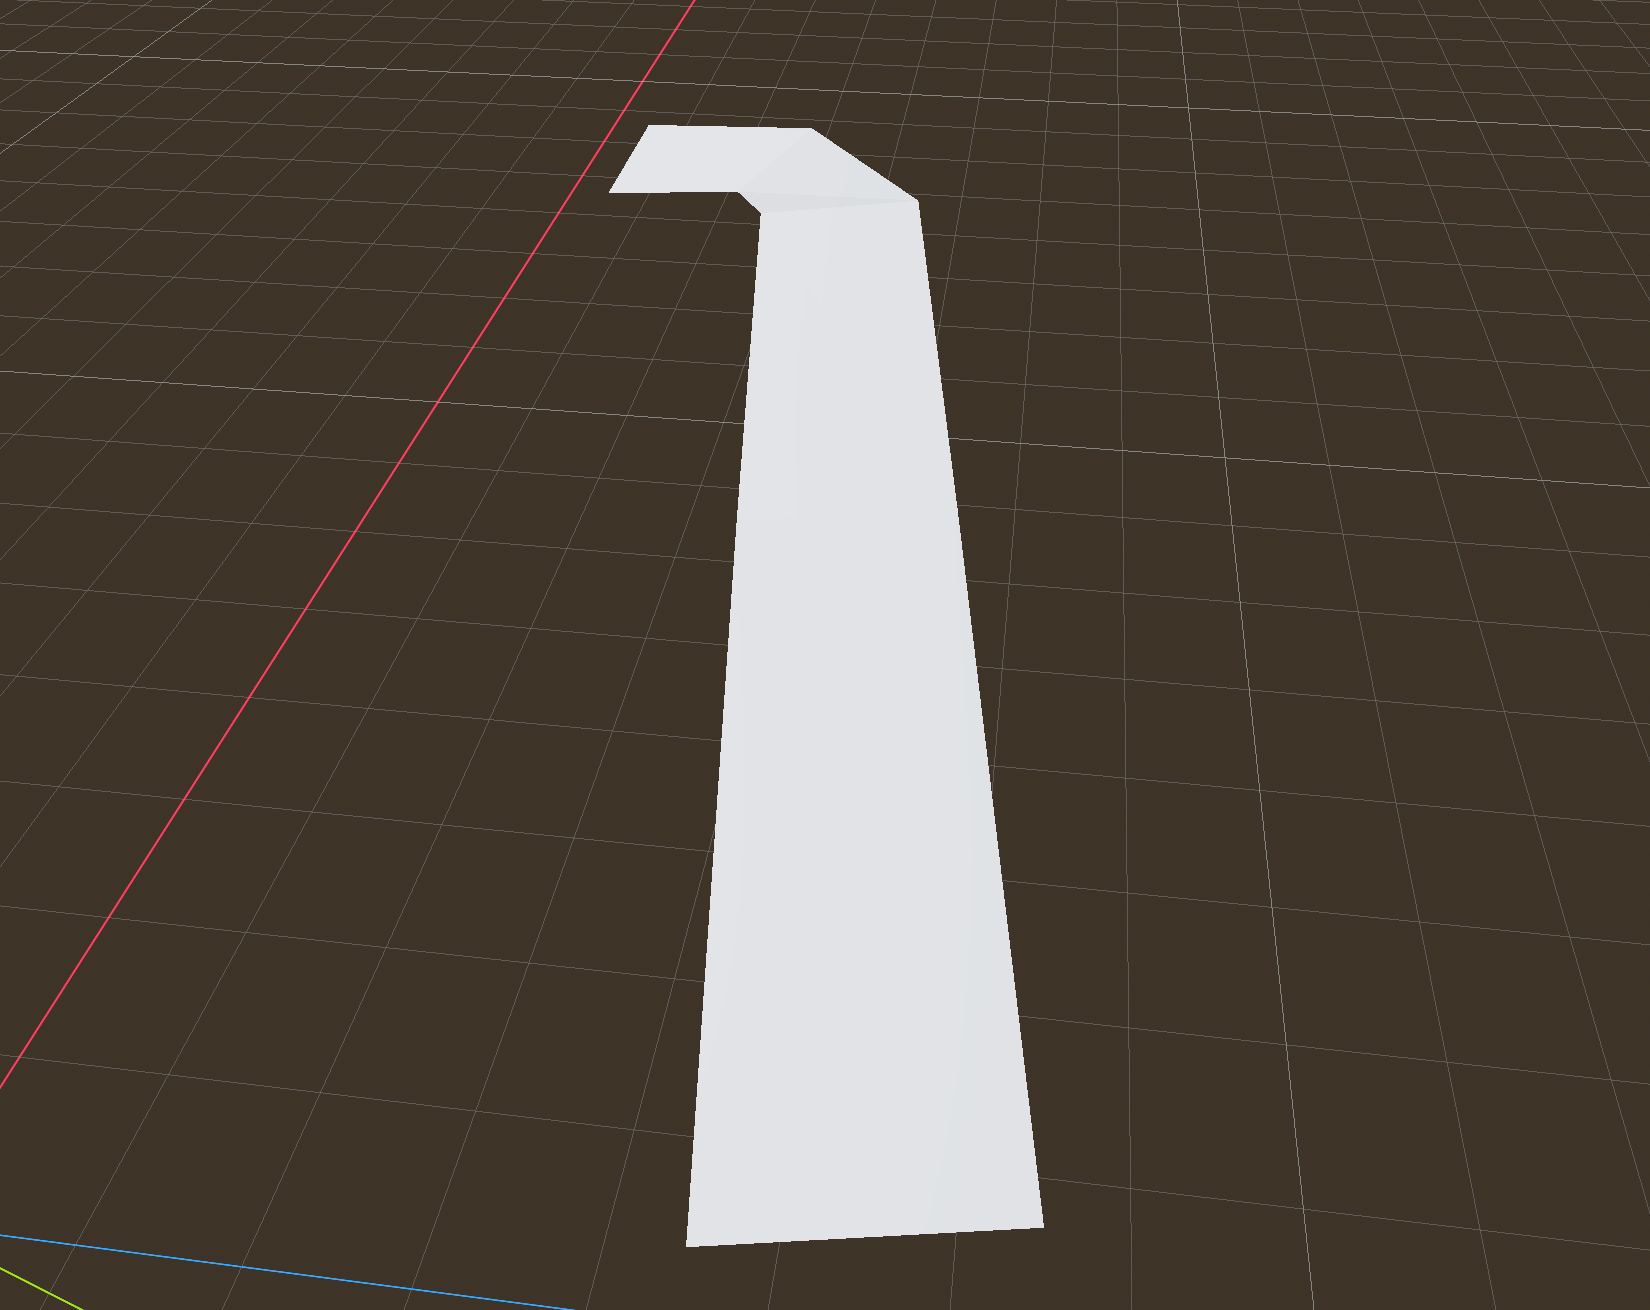
All I needed to do now was to texture it (and the terrain beneath). Because I'm writing this post after-the-fact, it's hard to guide you through the process of how I did that (it also took weeks), but I created a ShaderMaterial with a shader script and applied it to the mesh (see previous blog post).
Here's the the shader code I wrote.
shader_type spatial;

uniform vec3 albedo : source_color;
uniform float metallic : hint_range(0.0, 3.0) = 0;
uniform float roughness : hint_range(0.0, 0.2) = 0.02;
uniform sampler2D texture_normal;
uniform sampler2D texture_normal2;
uniform vec2 water_direction = vec2(0.0, 1.0);
uniform vec2 wind_direction = vec2(0.5, 0.5);
uniform float time_scale : hint_range(0.0, 0.2, 0.005) = 0.025;

uniform sampler2D SCREEN_TEXTURE : hint_screen_texture, filter_linear_mipmap;

uniform float refraction_strength : hint_range(0.0, 1.0) = 0.05; // Control how strong the refraction effect is

void fragment() {
	vec3 color = albedo.rgb;

	vec2 time = (TIME * water_direction) * time_scale;
	vec2 time2 = (TIME * wind_direction) * time_scale;
	vec2 uv = UV.xy + time;
	vec2 uv2 = UV.xy + time2;
	vec3 normal = mix(
		texture(texture_normal, uv).rgb,
		texture(texture_normal, uv2).rgb,
		0.5
	);

	vec2 normal_distortion = (normal.xy * 2.0 - 1.0) * refraction_strength;

    // Apply distorted UV coordinates to sample screen texture for refraction effect
    vec3 refracted_color = texture(SCREEN_TEXTURE, SCREEN_UV + normal_distortion).rgb;

    // Final color mix with refraction
    color = mix(refracted_color, color, 0.06);

	ALBEDO = color;
	METALLIC = metallic;
	ROUGHNESS = roughness;
	NORMAL_MAP = normal;
}
In short, this is what it does...
It uses uniform vec3 albedo : source_color; to set a basic color for the water (dark unsaturated blue, in my case). Additionally, the following lines accept two (seamless) noise textures which we then combine.
uniform sampler2D texture_normal;
uniform sampler2D texture_normal2;
Every frame, we move the water in one direction by applying time to water_direction and we move the water in another direction by applying time to wind_direction to simulate water and wind.
If you want a deep-dive on this shader code, message me on Bluesky and I'll supplement this post (perhaps with a video), but I'm writing this post in a rush because I want to go to the pub.
Once I'd applied this shader code to the mesh, the river alone looked like this... not bad.
Not included in this post was that I'd adjusted my terrain - created way back in DevLog 1 - to create an indent for the river. Each point on the terrain was adjust by a value between 0 and -1 based on how close it was to the river's line abc
Once I added my river to my chunk along with terrain, the effect was much more noticeable. It wasn't perfect, but I'll improve it later when I need to.
It was much improved how (especial the refraction) once I put the river over the terrian.
A video of my river combined with terrain
In the video above, you can also see that I've edited the terrain shader to apply mud to river bank and also, there's a sneak peak at something coming up in the future I may write a post about (although it took much longer than simple rivers).
For now though, I'd added rivers (or at least the start of them to my game) and they were good enough to move on.
There're a lot of things I didn't mention in this post, and it's not a complete set of code for you to copy & paste. If you're interested in that or have questions message me on Bluesky and I'll see what I can put together.
For now though, I really appreciate the desire the for this post and the number of people who are interested in what I'm up to every week.
~ Sam
